
Mastering Intraoral Scanning:
Proven Techniques for Speed and Precision
Intraoral scanning is revolutionizing digital dentistry. Whether you're a general dentist, orthodontist, or prosthodontist, mastering IOS techniques can dramatically improve workflow efficiency, scan accuracy, and patient satisfaction.
In recent decades, significant advancements in dental technology have driven the digital transformation for practices seeking to elevate the patient experience. Digital imaging and software innovations empower practices to treat more patients efficiently and accurately—boosting clinical confidence and improving outcomes.
Today’s intraoral scanners are faster, more accurate, and easier to use. But they still require having the right technique to produce the best results for clinicians and patients. Whether you're just getting started or looking to refine your approach, this guide walks you through the essentials to help you scan with confidence.
Step-by-Step Scanning Techniques for Posterior, Anterior, and Full Arch Cases
Step 1: Preparing for a Successful Intraoral Scan
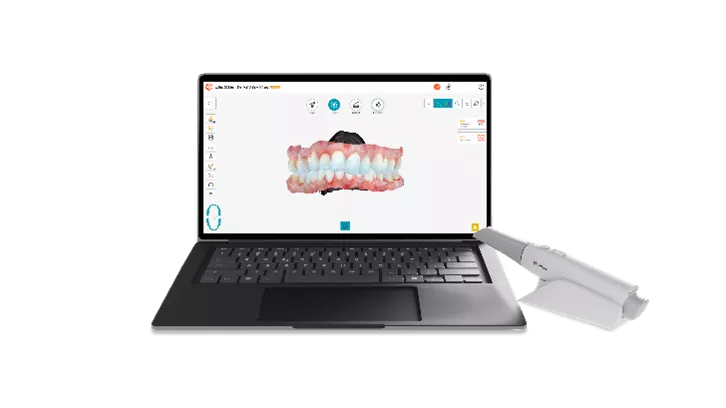
Set Up Your Technology
Ensure your scanner is properly calibrated, charged, and that the tip is sterilized. If your software has the ability to save a pre-set workflow, set it up beforehand to save time chairside. Position your computer for easy viewing, as well, so you can see the screen and images while you’re scanning.

Prepare the Field
You’ll need a dry, clean, and well-lit field to ensure accurate and complete data capture. Remove any debris from your patient’s teeth and have the patient swallow before initiating scanning.
Set Expectations with Your Patient
Give your patient a high-level overview of how your intraoral scanner works, the scan path you’ll follow and about how long the process will take. Periodically check in to see how they’re doing and, if possible, position the patient to see your screen.

STEP 2: Develop Your IOS Scanning Technique
Find Your Angle
For the best results, position the intraoral scanner tip close to the teeth and parallel or at around a 45-degree angle to the surface of the tooth you’re scanning.
Scan in Sections
Scanning the teeth in sections may allow for better control and can prevent over-scanning and redundant passes that waste time. Here are some suggested scan paths you can use:
- Posterior cases: Start on the occlusal surface and move from the molars to the canines. Then angle the scanner to the buccal area and move from canines to molars. Finally, angle the scanner to the lingual area and move from molars to canines.
- Anterior cases: Start on the facial side of the canine and slide the scanner over the incisal surface to the lingual area. Then move to the lateral teeth and slide the scanner from the lingual to the incisal to the facial surfaces. On the next tooth, move back from facial to incisal to lingual. Repeat until the anteriors are scanned.
- Full arch cases: Start in the posterior region, then scan the anterior region, and finish with the posterior.
Some imaging software automatically stitches scan sections together, eliminating the need for a fixed scan path. If your software doesn’t have this capability, follow the correct order as outlined in your software.
*Bonus Scanning Tips
Avoid the Voids
It’s less about how fast you go, and more about how smoothly you scan. Maintain a consistent smooth motion as you scan, rolling over the tops of the teeth, to prevent connected voids that the imaging software may struggle to interpret – especially with anterior areas. Overlapping is also important – we recommend a 20%-30% overlap between the known and unknown image.
Get Depth
Ensure your scanner has a broad enough depth of field to capture the needed depth without losing clarity.
Focus on the Tooth
Keep in mind that capturing too much tissue and not enough tooth may also result in voids. So be sure you’re covering enough of the tooth structure in your scans to provide the data you and the lab need.
Practice Makes Perfect
In time, you and your team will increase your comfort and proficiency with the scanner and discover the intraoral scanning technique that delivers the best results.
STEP 3: Maximize Your Software’s Capabilities
Margin Line Detection
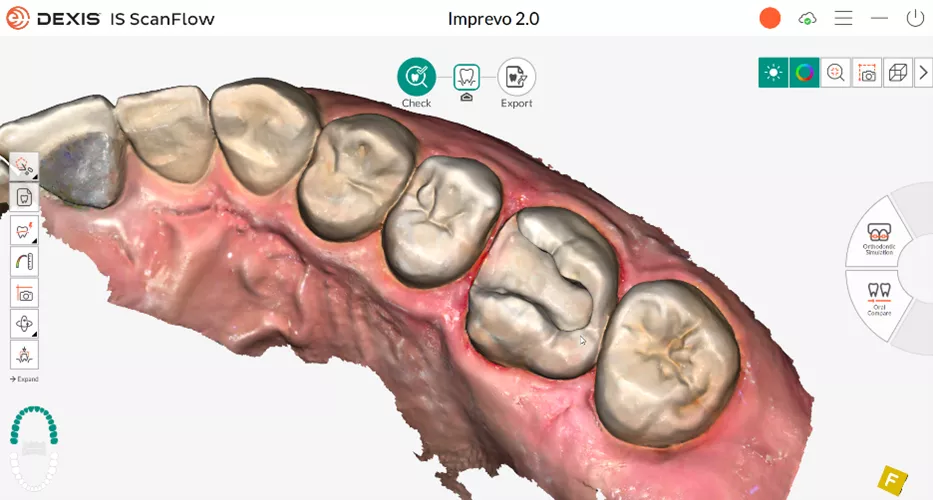
It’s critical to capture the precise boundary where the dental restoration, such as a crown, meets the prepared natural tooth. Within your software, select a specific tooth to define a margin line (although complex cases may require you to set multiple points) then detect and trace the margin. Some imaging software, such as IS ScanFlow, may have capabilities to auto-detect and trace, eliminating manual steps.

Checking Occlusion and Undercut
To check the occlusion, visualize and measure the distance between opposing arches and ensure proper bite alignment. In IS ScanFlow, you would use the matching tool to automatically overlay scans and check occlusion. Rotate and zoom your model to visualize undercuts from different angles, and to adjust the path of insertion if needed.

Re-Scan Areas, If Needed
If your software allows it, lock in the data that’s properly scanned so you don’t overwrite it, then scan just the area that needs additional data.

AI-Powered Tools
If your software has AI tools that help remove manual steps, take advantage of them – they can save you significant time by automating manual tasks. For example, IS ScanFlow has AI-powered tools such as soft tissue removal, shade matching, and scanbody detection.

Integrations
Ideally, your imaging software should integrate seamlessly not only with your intraoral scanner, but with your practice management system, your lab’s systems, and 3D printers. Opting for imaging software that supports open file formats so you’re free to work with your current systems and partners is key.

Pick the Right Partner
As technology continues to evolve, practices that stay ahead of the technology curve will have the advantage. Taking the time to train your team, practice your scanning proficiency, maintain your scanners, and learn the ins and out of your software will go a long way toward improving your workflow efficiency, practice productivity, and patient satisfaction.
Make sure to work with a company that is actively innovating to keep their customers on the cutting edge.


